python之路-CSS的学习,python之路-css,CSS基本概念CSS
python之路-CSS的学习,python之路-css,CSS基本概念CSS
CSS基本概念
CSS(cascading style sheet,层叠样式表)是一种制作网页的新技术,现在已经为大多数浏览器所支持,成为网页设计必不可少的工具之一
优点:
1.使网页代码更少,网页下载更快
2.实现了内容与样式的分离,使网站维护更快捷
3.使网页与浏览器的兼容性更好
每个CSS样式由两个组成部分:选择器和声明。声明又包括属性和属性值。每个声明之后用分号结束。
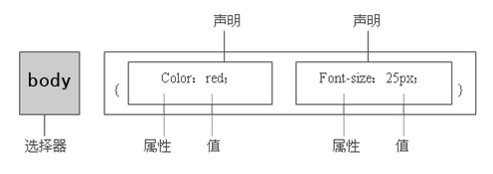
在css的三个组成部分中,“对象”是很重要的,它指定了对哪些网页元素进行设置,因此,它有一个专门的名称——选择器(selector)
CSS样式
2.css的编写方式
2.1 行内样式
<!DOCTYPE html><html lang="en"> <head> <meta charset="UTF-8"> <title>Title</title> </head> <body> <div style="color: red;font-size: 20px">css初体验</div> <div style="color: red;font-size: 30px">css初体验</div> <div style="color: red;font-size: 40px">css初体验</div> </body></html>
2.2 内部样式


1 <!DOCTYPE html> 2 <html lang="en"> 3 <head> 4 <meta charset="UTF-8"> 5 <title>Title</title> 6 <style type="text/css"> 7 div{ 8 color: red; 9 font-size: 12px;10 11 }12 </style>13 </head>14 <body>15 <div >css初体验</div>16 <div >css初体验</div>17 <div >css初体验</div>18 </body>19 </html>View Code 各种选择器
--标签选择器(此类型做修改时,相同标签的属性均被修改)
1 <!DOCTYPE html> 2 <html lang="en"> 3 <head> 4 <meta charset="UTF-8"> 5 <title>Title</title> 6 <style type="text/css"> 7 div{ 8 color: red; 9 font-size: 12px;10 11 }12 </style>13 </head>14 <body>15 <div >css初体验</div>16 <div >css初体验</div>17 <div >css初体验</div>18 </body>19 </html>View Code--id选择器(可以单独修改某个标签的属性)
1 <!DOCTYPE html> 2 <html lang="en"> 3 <head> 4 <meta charset="UTF-8"> 5 <title>Title</title> 6 <style type="text/css"> 7 #one{ 8 color: red; 9 font-size: 12px;10 }11 #two{12 color: red;13 font-size: 12px;14 }15 #three{16 color: red;17 font-size: 12px;18 }19 20 </style>21 </head>22 <body>23 <div id="one" >css初体验</div>24 <div id="two">css初体验</div>25 <div id="three">css初体验</div>26 </body>27 </html>View Codeid不要重复 只能唯一
--类选择器(对同一类型做修改,名字可以相同也可以不相同)
1 <!DOCTYPE html> 2 <html lang="en"> 3 <head> 4 <meta charset="UTF-8"> 5 <title>Title</title> 6 <style type="text/css"> 7 .one{ 8 color: red; 9 font-size: 12px;10 }11 .three{12 color: pink;13 font-size: 12px;14 }15 16 </style>17 </head>18 <body>19 <div class="one" >css初体验</div>20 <div class="one">css初体验</div>21 <div class="three">css初体验</div>22 </body>23 </html>View Code--包含选择器(有包含关系,可以是id选择器,也可以是类选择性)
1 <!DOCTYPE html> 2 <html lang="en"> 3 <head> 4 <meta charset="UTF-8"> 5 <title>Title</title> 6 <style type="text/css"> 7 .four span{ 8 color: green; 9 font-size: 48px;10 }11 12 </style>13 </head>14 <body>15 <div class="one" >css初体验</div>16 <div class="one">css初体验</div>17 <div class="three">css初体验</div>18 <div class="four">19 <span>css测试</span>20 </div>21 </body>22 </html>View Code--分组选择器(网页中有很多元素,并且想同时对这些元素进行修改)
1 <!DOCTYPE html> 2 <html lang="en"> 3 <head> 4 <meta charset="UTF-8"> 5 <title>Title</title> 6 <style type="text/css"> 7 div,span,h2{ 8 color: yellow; 9 font-size: 30px;10 }11 </style>12 </head>13 <body>14 <div class="one" >css初体验</div>15 <div class="one">css初体验</div>16 <div class="three">css初体验</div>17 <div class="four">18 <span>css测试</span>19 </div>20 <span>hahahaaha</span>21 <h2>weiweiiweiwe</h2>22 </body>23 </html>View Code
--通用选择器
1 <!DOCTYPE html> 2 <html lang="en"> 3 <head> 4 <meta charset="UTF-8"> 5 <title>Title</title> 6 <style type="text/css"> 7 * { 8 background-color: gray; 9 }10 </style>11 </head>12 <body>13 <div class="one" >css初体验</div>14 <div class="one">css初体验</div>15 <div class="three">css初体验</div>16 <div id="four">17 <span>css测试</span>18 <p>css1231231</p>19 </div>20 <span>hahahaaha</span>21 <h2>weiweiiweiwe</h2>22 </body>23 </html>View Code--伪类选择器(对超链接进行操作)
:link 定义超链接默认样式
:visited 定义访问过的样式
:hover 定义鼠标经过的样式
:active 定义鼠标按下的样式
a:link { color:#ff0000; } /*默认样式,超链接文字为红色*/
a:visited { color:#00ff00; } /*访问过后,超链接文字为绿色*/
a:hover { color:#0000ff; } /*鼠标经过,超链接文字为蓝色*/
a:active { color:#ffff00; } /*鼠标按下时,超链接文字为黄色*/
1 <!DOCTYPE html> 2 <html lang="en"> 3 <head> 4 <meta charset="UTF-8"> 5 <title>Title</title> 6 <style type="text/css"> 7 a:hover{ 8 color: yellow; 9 }10 a:active{11 color: green;12 }13 a:visited{14 color: pink;15 }16 a:link{17 color:red;18 }19 </style>20 </head>21 <body>22 <a href="http://www.baidu.com" target="_blank">百度</a>23 24 </body>25 </html>View Code选择器的优先级:
行内样式 > id选择器 > 类选择器 > 标签选择器 > 通用选择器
1 <!DOCTYPE html> 2 <html lang="en"> 3 <head> 4 <meta charset="UTF-8"> 5 <title>Title</title> 6 <style type="text/css"> 7 #show { 8 color: red; 9 }10 .show1{11 color: green;12 }13 * {14 color: blue;15 }16 17 </style>18 </head>19 <body>20 21 <h2 id="show" class="show1" style="color: yellow">weiweiiweiwe</h2>22 </body>23 </html>View Code2.3 外部样式(将syle中的内容写入文件中,通过link连接,文件名用.css结尾)
1 <!DOCTYPE html> 2 <html lang="en"> 3 <head> 4 <meta charset="UTF-8"> 5 <title>Title</title> 6 <link rel="stylesheet" href="a.css"> 7 <style type="text/css"> 8 9 10 </style>11 </head>12 <body>13 14 weiweiiweiwe15 </body>16 </html>View Code
3.css的基本属性
--文字段落
边框设置:border
宽度,样式,颜色 (border: 1px solid red;) 1px代表边框的粗细,solid代表框的线是实线。
文本行高:line-height 如果想居中的话,一般这个值等于标签的height的值就可以。(上下距离)
语法: line-height:行高值(像素)
水平对齐: text-align (左右距离)
left:左对齐;
right:右对齐
center:居中对齐
文字属性
font-size: 字体大小
color: 颜色
背景属性
背景颜色:background-color
关键字:red pink orange
背景图像:background-image
使用background-image属性可以设置元素的背景图像。
语法:background-image:url(图像地址)
1 <!DOCTYPE html> 2 <html lang="en"> 3 <head> 4 <meta charset="UTF-8"> 5 <title>Title</title> 6 <link rel="stylesheet" href="a.css"> 7 <style type="text/css"> 8 #myimage{ 9 width: 150px;10 height: 150px;11 background-image: url("images/1.jpg");12 }13 14 15 </style>16 </head>17 <body>18 <div id="myimage">19 20 </div>21 22 </body>23 </html>View Code 背景重复:background-repeat
语法:background-repeat:取值
Repeat(默认) 背景图像平铺排满整个网页
repeat-x 背景图像只在水平方向上平铺;
repeat-y 背景图像只在垂直方向上平铺。
no-repeat 背景图像不平铺
1 <!DOCTYPE html> 2 <html lang="en"> 3 <head> 4 <meta charset="UTF-8"> 5 <title>Title</title> 6 <link rel="stylesheet" href="a.css"> 7 <style type="text/css"> 8 #myimage{ 9 width: 150px;10 height: 150px;11 background-image: url("images/1.jpg");12 background-repeat: repeat-y;13 }14 15 16 </style>17 </head>18 <body>19 <div id="myimage">sdfjiejfisjdifejjifsidfjie</div>20 21 </body>22 </html>View Code
背景位置(案例:现在一般都是选一张大图,这张图片中包含好多小图片,通过移动位置就可以看到不同的内容):
background-position
background-position-x:200px ;
background-position-y:100px;
1 <!DOCTYPE html> 2 <html lang="en"> 3 <head> 4 <meta charset="UTF-8"> 5 <title>Title</title> 6 <link rel="stylesheet" href="a.css"> 7 <style type="text/css"> 8 #myimage{ 9 width: 17px;10 height: 19px;11 background-image: url("images/123.png");12 border: 1px solid red;13 background-position-y:72px;14 }15 16 17 </style>18 </head>19 <body>20 <div id="myimage"></div>21 22 </body>23 </html>View Code
4.布局属性
边距属性
margin是对外元素的距离,用来控制元素本身的浮动位置
四边距margin
上边距margin-top
下边距margin-bottom
左边距margin-left
右边距margin-right
margin 10px 20px 30px 40px;
提供一个,用于的四边;
提供两个,第一个用于上-下,第二个用于左-右;
如果提供三个,第一个用于上,第二个用于左-右,第三个用于下;
提供四个参数值,将按上-右-下-左的顺序作用于四边;
居中显示
1 <!DOCTYPE html> 2 <html lang="en"> 3 <head> 4 <meta charset="UTF-8"> 5 <title>Title</title> 6 <style type="text/css"> 7 #user{ 8 width: 400px; 9 height: 200px;10 border: 1px solid red;11 }12 #root{13 width: 300px;14 height: 100px;15 border: 1px solid blue;16 margin-top: 10px;17 margin-left: 10px;18 margin: auto; 左右居中19 }20 21 </style>22 </head>23 <body>24 <div id="user">25 <div id="root"></div>26 </div>27 28 </body>29 </html>View Code填充属性
padding是对内元素,用来控制元素内部元素的位置
四边填充 padding
上填充 padding-top
下填充 padding-bottom
左填充 padding-left
右填充 padding-right
padding 10px 20px 30px 40px;
提供一个,用于的四边;
提供两个,第一个用于上-下,第二个用于左-右;
如果提供三个,第一个用于上,第二个用于左-右,第三个用于下;
提供四个参数值,将按上-右-下-左的顺序作用于四边;
1 <!DOCTYPE html> 2 <html lang="en"> 3 <head> 4 <meta charset="UTF-8"> 5 <title>Title</title> 6 <style type="text/css"> 7 #main{ 8 width: 400px; 9 height: 200px;10 border: 1px solid red;11 padding-top: 10px;12 padding-bottom: 10px;13 padding-left: 10px;14 padding-right: 10px;15 }16 17 18 </style>19 </head>20 <body>21 <div id="main">字体测试</div>22 23 </body>24 </html>View Code布局属性float(类似于淘宝商城中商品的排列)
float:none; 默认值
float:left;左浮
float:right;右浮
1 <!DOCTYPE html> 2 <html lang="en"> 3 <head> 4 <meta charset="UTF-8"> 5 <title>Title</title> 6 <style type="text/css"> 7 .one{ 8 width: 200px; 9 height: 100px;10 border: 1px solid red;11 float: left;12 margin: 0 10px;13 }14 15 </style>16 </head>17 <body>18 <div class="one">one</div>19 <div class="one">one</div>20 <div class="one">one</div>21 22 </body>23 </html>View Code案例1:

1 <!DOCTYPE html> 2 <html lang="en"> 3 <head> 4 <meta charset="UTF-8"> 5 <title>Title</title> 6 <style type="text/css"> 7 body{ 8 margin: 0; 9 }10 .contnet{11 width: 980px;12 margin: 0 auto;13 line-height: 48px;14 }15 .main{16 height: 48px;17 /*border: 1px solid red;*/18 background-color: gray;19 }20 #user1{21 22 /*height: 48px;*/23 /*border: 1px solid blue;*/24 float: left;25 26 }27 #user2{28 /*height: 48px;*/29 /*border: 1px solid blue;*/30 float: right;31 32 }33 a:hover{34 color: red;35 }36 37 38 </style>39 </head>40 <body>41 <div class="main">42 <div class="contnet">43 <div id="user1">请登录</div>44 <div id="user2">45 <a href="#">我的淘宝</a>46 <a href="#">我的支付宝</a>47 </div>48 </div>49 </div>50 51 </body>52 </html>View Code布局属性position
fixed : 将某个元素固定在页面的某个位置(类似于网页中的广告、返回顶部的模块,还有下拉时,顶部菜单栏一直保持在页面的最上端)
特点:
1.相对于浏览器的窗口来进行定位的
2.固定到窗口的某个位置上,不随内容而滚动
3.如果不设置定位坐标,就在原来的位置,否则反之
1 <!DOCTYPE html> 2 <html lang="en"> 3 <head> 4 <meta charset="UTF-8"> 5 <title>Title</title> 6 <style> 7 body{ 8 margin: 0; 9 }10 .info{11 height: 300px;12 border: 1px solid red;13 position: fixed;14 top:0;15 left: 0;16 right: 0;17 }18 .info1{19 height: 900px;20 border: 1px solid blue;21 }22 .info2{23 width: 90px;24 height: 48px;25 border: 1px solid yellow;26 position: fixed;27 right: 0;28 bottom: 0;29 }30 31 </style>32 </head>33 <body>34 <div class="info">sdfsdfsdfsdf</div>35 <div class="info1"> sdfsdfsdfsdf</div>36 <div class="info2">返回顶部</div>37 38 </body>39 </html>View Code
absolute : 绝对定位(相对于浏览器定位的)
特点:
1.相对于(父级元素的定位方式(relative )来进行定位 找祖先元素是否有定位,如果没有定位,找到body,就相对body来定位 如果找到祖先元素有定位,相对祖先元素来定位
2.不占空间
1 <!DOCTYPE html> 2 <html lang="en"> 3 <head> 4 <meta charset="UTF-8"> 5 <title>Title</title> 6 <style> 7 body{ 8 margin: 0; 9 }10 .one{11 width: 200px;12 height: 100px;13 border: 1px solid red;14 position: absolute;15 left: 50px;16 right: 50px;17 }18 .two{19 width: 200px;20 height: 100px;21 border: 1px solid red;22 }23 .three{24 width: 200px;25 height: 100px;26 border: 1px solid red;27 }28 </style>29 </head>30 <body>31 <div class="one"></div>32 <div class="two"></div>33 <div class="three"></div>34 35 </body>36 </html>View Code如果有父级元素的话就是相对于父级元素
1 <!DOCTYPE html> 2 <html lang="en"> 3 <head> 4 <meta charset="UTF-8"> 5 <title>Title</title> 6 <style> 7 body{ 8 margin: 0; 9 }10 .one{11 width: 200px;12 height: 100px;13 border: 1px solid red;14 position: absolute;15 left: 50px;16 right: 50px;17 }18 .two{19 width: 200px;20 height: 100px;21 border: 1px solid red;22 }23 .three{24 width: 200px;25 height: 100px;26 border: 1px solid red;27 }28 .wrap_one{29 width: 300px;30 height: 150px;31 border: 1px solid green;32 position: relative;33 }34 </style>35 </head>36 <body>37 <div class="two"></div>38 <div class="wrap_one">39 <div class="one"></div>40 </div>41 <div class="three"></div>42 43 </body>44 </html>View Code案例练习:
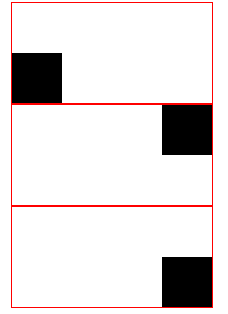
1 <!DOCTYPE html> 2 <html lang="en"> 3 <head> 4 <meta charset="UTF-8"> 5 <title>Title</title> 6 <style> 7 .one{ 8 width: 200px; 9 height: 100px;10 border: 1px solid red;11 position: relative;12 margin: 0 auto;13 }14 #two{15 width: 50px;16 height:50px;17 background-color: black;18 position: absolute;19 left: 0;20 bottom:0;21 22 23 24 }25 #three{26 width: 50px;27 height:50px;28 background-color: black;29 position: absolute;30 right:0;31 }32 #four{33 width: 50px;34 height:50px;35 background-color: black;36 position: absolute;37 right:0;38 bottom:0;39 }40 </style>41 </head>42 <body>43 <div class="one">44 <div id="two"></div>45 </div>46 <div class="one">47 <div id="three"></div>48 </div>49 <div class="one">50 <div id="four"></div>51 </div>52 53 </body>54 </html>View Code
relative:相对定位(相对于原来的位置,坐标原点,左上角)
特点:
1.相对定位是相对于,自身的左上角为坐标点
2.占据空间
定位方式通常与定位坐标一起使用
定位坐标:要定位的元素偏离目标位置多远的距离
Top,left,right,bottom
1 <!DOCTYPE html> 2 <html lang="en"> 3 <head> 4 <meta charset="UTF-8"> 5 <title>Title</title> 6 <style> 7 body{ 8 margin: 0; 9 }10 .one{11 width: 200px;12 height: 100px;13 border: 1px solid red;14 position: relative;15 left: 50px;16 right: 50px;17 }18 .two{19 width: 200px;20 height: 100px;21 border: 1px solid red;22 }23 .three{24 width: 200px;25 height: 100px;26 border: 1px solid red;27 }28 </style>29 </head>30 <body>31 <div class="one"></div>32 <div class="two"></div>33 <div class="three"></div>34 </body>35 </html>View Code商品列表案列
1 <!DOCTYPE html> 2 <html lang="en"> 3 <head> 4 <meta charset="UTF-8"> 5 <title>Title</title> 6 <style> 7 body{ 8 background-color: gray; 9 margin: 0; 10 } 11 .pg-body{ 12 width: 780px; 13 margin: 0 auto; 14 border: 1px solid red; 15 background-color: white; 16 } 17 .item{ 18 padding: 10px; 19 border: 1px solid #dddddd; 20 margin: 10px; 21 float: left; 22 position: relative; 23 } 24 p{ 25 text-align: center; 26 font-size: 12px; 27 } 28 span{ 29 color: red; 30 padding: 30px;; 31 } 32 .hot{ 33 position: absolute; 34 right: 0; 35 top:0; 36 } 37 h2{ 38 text-align: center; 39 } 40 </style> 41 </head> 42 <body> 43 <div class="pg-body"> 44 <h2>限时抢购</h2> 45 <div class="item"> 46 <img src="images/01.jpg" > 47 <p>[特价款]雷朋板材光学眼镜架<br> 48 年终盛典 满128减30元</p> 49 <span>¥476.00</span> <u>¥1360</u> 50 <div class="hot"> 51 <img src="images/xsq.png" > 52 </div> 53 54 </div> 55 <div class="item"> 56 <img src="images/01.jpg" > 57 <p>[特价款]雷朋板材光学眼镜架<br> 58 年终盛典 满128减30元</p> 59 <span>¥476.00</span> <u>¥1360</u> 60 <div class="hot"> 61 <img src="images/xsq.png" > 62 </div> 63 64 </div> 65 <div class="item"> 66 <img src="images/01.jpg" > 67 <p>[特价款]雷朋板材光学眼镜架<br> 68 年终盛典 满128减30元</p> 69 <span>¥476.00</span> <u>¥1360</u> 70 <div class="hot"> 71 <img src="images/xsq.png" > 72 </div> 73 74 </div> 75 <div class="item"> 76 <img src="images/01.jpg" > 77 <p>[特价款]雷朋板材光学眼镜架<br> 78 年终盛典 满128减30元</p> 79 <span>¥476.00</span> <u>¥1360</u> 80 <div class="hot"> 81 <img src="images/xsq.png" > 82 </div> 83 84 </div> 85 <div class="item"> 86 <img src="images/01.jpg" > 87 <p>[特价款]雷朋板材光学眼镜架<br> 88 年终盛典 满128减30元</p> 89 <span>¥476.00</span> <u>¥1360</u> 90 <div class="hot"> 91 <img src="images/xsq.png" > 92 </div> 93 94 </div> 95 <div class="item"> 96 <img src="images/01.jpg" > 97 <p>[特价款]雷朋板材光学眼镜架<br> 98 年终盛典 满128减30元</p> 99 <span>¥476.00</span> <u>¥1360</u>100 <div class="hot">101 <img src="images/xsq.png" >102 </div>103 104 105 </div>106 <div style="clear: both"></div>107 108 </div>109 110 111 </body>112 </html>View Code布局属性z-index
设置对象的层叠顺序
特点:
较大 number 值的对象会覆盖在较小 number 值的对象之上
1 <!DOCTYPE html> 2 <html lang="en"> 3 <head> 4 <meta charset="UTF-8"> 5 <title>Title</title> 6 <style> 7 *{ 8 margin: 0; 9 }10 .one{11 height: 2000px;12 background-color: #999999;13 }14 .two{15 height: 2050px;16 background-color: blue;17 position: fixed;18 top:0;19 left: 0;20 right: 0;21 opacity: 0.3;22 23 }24 .three{25 width: 400px;26 height: 500px;27 background-color: white;28 position: fixed;29 top: 100px;;30 left: 400px;;31 right: 400px;32 z-index: 10;33 }34 35 </style>36 </head>37 <body>38 <div class="one"></div>39 <div class="two"></div>40 <div class="three"></div>41 </body>42 </html>View Code设置z-index值就是为了防止标签顺序混乱后导致层叠出问题。
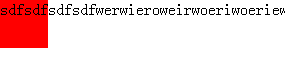
布局属性overflow
1 <!DOCTYPE html> 2 <html lang="en"> 3 <head> 4 <meta charset="UTF-8"> 5 <title>Title</title> 6 <style> 7 body{ 8 margin: 0; 9 }10 .info{11 width: 48px;12 height: 48px;13 background-color: red;14 }15 16 </style>17 </head>18 <body>19 <div class="info">sdfsdfsdfsdfwerwieroweirwoeriwoeriew</div>20 21 22 </body>23 </html>View Code如果没有设置overflow属性,就是如下情况
设置overflow属性
1 <!DOCTYPE html> 2 <html lang="en"> 3 <head> 4 <meta charset="UTF-8"> 5 <title>Title</title> 6 <style> 7 body{ 8 margin: 0; 9 }10 .info{11 width: 100px;12 height: 100px;13 background-color: red;14 overflow-x: auto;15 16 }17 18 </style>19 </head>20 <body>21 <div class="info">sdfsdfsdfsdfwerwieroweirwoeriwoeriew</div>22 23 24 25 26 </body>27 </html>View Code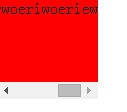
display属性
block:将元素变成块级标签,可以设置高度和宽度
Inline:将元素变成行内标签,不能设置高度和宽度
Inline-block:同时具有两种
none:标签消失
<span style="background-color: gray;height:70px;width:20px;">行内标签</span>
案例制作:

1 <!DOCTYPE html> 2 <html lang="en"> 3 <head> 4 <meta charset="UTF-8"> 5 <title>Title</title> 6 <style> 7 * { 8 margin: 0; 9 }10 #main{11 height: 48px;12 background-color: blue;13 line-height: 48px;14 }15 #info1{16 float: left;17 }18 #info2{19 height: 48px;20 float: right;21 }22 23 #info2 a:hover{24 color: white;25 background-color: red;26 }27 .meue{28 display: inline-block;29 color: white;30 }31 </style>32 </head>33 <body>34 <div id="main">35 <div id="info1">36 <div id="info">抽屉新热榜</div>37 </div>38 <div id="info2">39 <a class="meue">全部</a>40 <a class="meue">42区</a>41 <a class="meue">段子</a>42 <a class="meue">挨踢1024</a>43 <a class="meue">图片</a>44 <a class="meue">你问我答</a>45 </div>46 47 48 </div>49 50 </body>51 </html>View Code简单来说,line-height是行高的意思,height则是定义元素自身的高度。
5.浏览器兼容性的问题
python之路-CSS的学习
相关内容
- python-字典练习,python-字典,备注:此次练习使用3
- python *与**,python,python中,在形
- 使用python对文件中的数值进行累加的实例,python累加
- 浅谈pyhton学习中出现的各种问题(新手必看),pyhton新手
- 请不要重复犯我在学习Python和Linux系统上的错误,pyth
- 浅谈python 四种数值类型(int,long,float,complex),pythoncompl
- 新手该如何学python怎么学好python?
- python 映射列表 学习
- Python 学习入门(38)—— @functools模块
- 机器学习算法与Python实践之(七)逻辑回归(Logistic
评论关闭