Python学习-终端字体高亮显示1,python高亮显示,1、采用原生转义字符
Python学习-终端字体高亮显示1,python高亮显示,1、采用原生转义字符
1、采用原生转义字符序列,对Windows有的版本不支持(比如win7),完美支持Linux
实现过程:
终端的字符颜色是用转义序列控制的,是文本模式下的系统显示功能,和具体的语言无关。
转义序列是以ESC开头,即用\033来完成(ESC的ASCII码用十进制表示是27,用八进制表示就是033)。
格式:
开头部分:\033[显示方式;前景色;背景色m +结尾部分:\033[0m
注意:开头部分的三个参数:显示方式,前景色,背景色是可选参数,可以只写其中的某一个;另外由于表示三个参数不同含义的数值都是唯一的没有重复的,所以三个参数的书写先后顺序没有固定要求,系统都能识别;但是,建议按照默认的格式规范书写。 对于结尾部分,其实也可以省略,但是为了书写规范,建议\033[***开头,\033[0m结尾。用这种原生的转义序列输出,在linux下完全支持,但是在windows下确存在兼容问题,比如在win10下可以正常显示颜色,在win7下确不支持。因此可以使用python标准库提供的colorama模块输出彩色字体,这个模块是跨平台的,内部实现也是采用转义序列来显示颜色的,只不过对windows平台做了特殊处理,因此完全兼容linux和windows各个版本。数值参数表示的意义:说明:| 前景色 | 背景色 | 颜色 |
| 30 | 40 | 黑色 |
| 31 | 41 | 红色 |
| 32 | 42 | 绿色 |
| 33 | 43 | 黄色 |
| 34 | 44 | 蓝色 |
| 35 | 45 | 紫红色 |
| 36 | 46 | 青蓝色 |
| 37 | 47 | 白色 |
显示方式:
| 显示方式 | 意义 |
| 0 | 终端默认设置 |
| 1 | 高亮显示 |
| 4 | 使用下划线 |
| 5 | 闪烁 |
| 7 | 反白显示 |
| 8 | 不可见 |

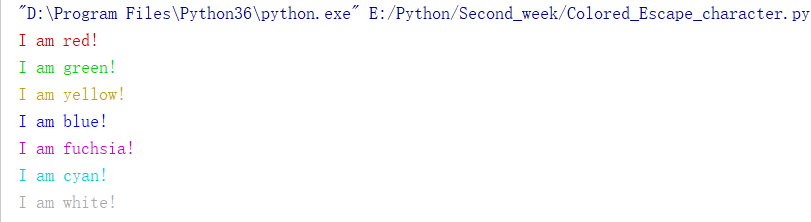
1 #!/usr/bin/env python3 2 # -*- coding: utf-8 -*- 3 # @Time : 2018/4/29 10:27 4 # @Author : yang 5 # @File : Colored_Escape_character.py 6 # @Software: PyCharm 7 #-------------------------------- 8 #显示格式:\033[显示方式;前景色;背景色m 9 #--------------------------------10 #显示方式 说明11 # 0 终端默认设置12 # 1 高亮显示13 # 4 使用下划线14 # 5 闪烁15 # 7 反白显示16 # 8 不可见17 # 22 非粗体18 # 24 非下划线19 # 25 非闪烁20 #21 #前景色 背景色 颜色22 # 30 40 黑色23 # 31 41 红色24 # 32 42 绿色25 # 33 43 黄色26 # 34 44 蓝色27 # 35 45 紫红色28 # 36 46 青蓝色29 # 37 47 白色30 #---------------------------------------31 class Colored(object):32 RED = ‘\033[31m‘ #红色33 GREEN = ‘\033[32m‘ #绿色34 YELLOW = ‘\033[33m‘ #黄色35 BLUE = ‘\033[34m‘ #蓝色36 FUCHSIA = ‘\033[35m‘ #紫红色37 CYAN = ‘\033[36m‘ #青蓝色38 WHITE = ‘\033[37m‘ #白色39 #:no color40 RESET = ‘\033[0m‘ #终端默认颜色41 def color_str(self,color,s):42 return ‘{}{}{}‘.format(getattr(self,color),s,self.RESET)43 44 def red(self,s):45 return self.color_str(‘RED‘,s)46 def green(self,s):47 return self.color_str(‘GREEN‘,s)48 def yellow(self,s):49 return self.color_str(‘YELLOW‘,s)50 def blue(self,s):51 return self.color_str(‘BLUE‘,s)52 def fuchsia(self,s):53 return self.color_str(‘FUCHSIA‘,s)54 def cyan(self,s):55 return self.color_str(‘CYAN‘,s)56 def white(self,s):57 return self.color_str(‘WHITE‘,s)58 #-----------使用示例如下--------59 color = Colored()60 print(color.red(‘I am red!‘))61 print(color.green(‘I am green!‘))62 print(color.yellow(‘I am yellow!‘))63 print(color.blue(‘I am blue!‘))64 print(color.fuchsia(‘I am fuchsia!‘))65 print(color.cyan(‘I am cyan!‘))66 print(color.white(‘I am white!‘))输出结果:
2、采用Python标准库colorama模块--兼容linux和windows各个版本:
1 #!/usr/bin/env python3 2 # -*- coding: utf-8 -*- 3 # @Time : 2018/4/29 10:57 4 # @Author : yang 5 # @File : Colored_Colorama_module.py 6 # @Software: PyCharm 7 #--------------colorama模块的一些常量------- 8 #colorama是一个python专门用来在控制台、命令行输出彩色文字的模块,可以跨平台使用 9 # 在windows下linux下都工作良好,如果你想让控制台的输出信息更漂亮一些,可以使用给这个模块。10 # Fore: BLACK, RED, GREEN, YELLOW, BLUE, MAGENTA, CYAN, WHITE, RESET.11 # Back: BLACK, RED, GREEN, YELLOW, BLUE, MAGENTA, CYAN, WHITE, RESET.12 # Style: DIM, NORMAL, BRIGHT, RESET_ALL13 from colorama import init,Fore,Back,Style14 #init(autoreset=True)15 class Colored(object):16 def red(self,s):17 return Fore.RED + s + Fore.RESET18 def green(self,s):19 return Fore.GREEN + s + Fore.RESET20 def yellow(self,s):21 return Fore.YELLOW + s + Fore.RESET22 def blue(self,s):23 return Fore.BLUE + s + Fore.RESET24 def magenta(self,s):25 return Fore.MAGENTA + s + Fore.RESET26 def cyan(self,s):27 return Fore.CYAN + s + Fore.RESET28 def white(self,s):29 return Fore.WHITE + s + Fore.RESET30 def balck(self,s):31 return Fore.BLACK32 def white_green(self,s):33 return Fore.WHITE + Back.GREEN + s + Fore.RESET + Back.RESET34 color = Colored()35 print(color.red(‘I am red!‘))36 print(color.green(‘I am green!‘))37 print(color.yellow(‘I am yellow!‘))38 print(color.blue(‘I am blue!‘))39 print(color.magenta(‘I am magenta!‘))40 print(color.cyan(‘I am cyan!‘))41 print(color.white(‘I am white!‘))42 print(color.white_green(‘I am white green!‘))
输出结果: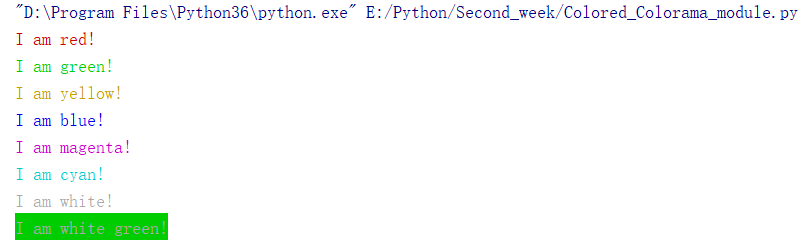 3、采用Python的termcolor模块:
termcolor是一个python包,可以改变控制台输出的颜色,支持各种terminal(WINDOWS的cmd.exe除外)。
支持下列的文字颜色:
grey, red, green, yellow, blue, magenta, cyan, white
支持下列的背景高亮:
on_grey, on_red, on_green, on_yellow, on_blue, on_magenta, on_cyan, on_white
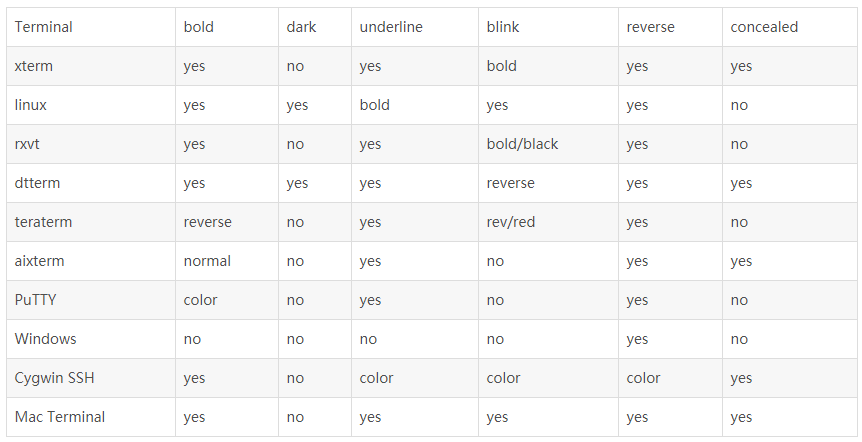
支持下列属性:
bold, dark, underline, blink, reverse, concealed
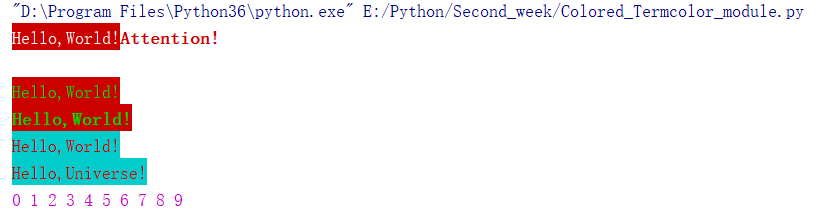
1 #!/usr/bin/env python3 2 # -*- coding: utf-8 -*- 3 # @Time : 2018/4/29 16:49 4 # @Author : yang 5 # @File : Colored_Termcolor_module.py 6 # @Software: PyCharm 7 import sys 8 from termcolor import colored,cprint 9 text = colored(‘Hello,World!‘,‘red‘,attrs=[‘reverse‘,‘blink‘])10 11 #colored(text, color=None, on_color=None, attrs=None)12 # Available text colors:13 # red, green, yellow, blue, magenta, cyan, white.14 15 # Available text highlights:16 # on_red, on_green, on_yellow, on_blue, on_magenta, on_cyan, on_white.17 18 # Available attributes:19 # bold, dark, underline, blink, reverse, concealed.20 #print(‘\033[5;7;31mHello,World!\033[0m‘)21 22 print(text)23 24 cprint(‘Hello,World!‘,‘green‘,‘on_red‘)25 #cprint(‘Hello,World!‘,‘green‘,‘on_red‘,attrs=[‘bold‘])26 #def cprint(text, color=None, on_color=None, attrs=None, **kwargs)27 28 print_red_on_cyan = lambda x:cprint(x,‘red‘,‘on_cyan‘)29 print_red_on_cyan(‘Hello,World!‘)30 print_red_on_cyan(‘Hello,Universe!‘)31 for i in range(10):32 cprint(i,‘magenta‘,end=‘ ‘)33 cprint(‘Attention!‘,‘red‘,attrs=[‘bold‘],file = sys.stderr)
输出结果:
参考:
1、https://pypi.org/project/colorama/
2、https://pypi.org/project/termcolor/#description
3、https://www.cnblogs.com/hellojesson/p/5961570.html
4、https://stackoverflow.com/questions/287871/print-in-terminal-with-colors/3332860#3332860
Python学习-终端字体高亮显示1
相关内容
- python正则表达式re 中m.group和m.groups的解释,m.groupm.gro
- python 之开发工具 sublimetext 3,pythonsublimetext,一、前言
- 并发体验:Python抓图的8种方式,并发python抓图8种,本文
- “本办法学python” ex49,本办法学pythonex49,1.创建目录结
- Python3 Tkinter基础 Checkbutton 使用for循环生成多个 anchor
- Python3基础 小技巧 为模块更换名字 import 模块名 as 别名
- 四十六 Python分布式爬虫打造搜索引擎Scrapy精讲—elas
- Python爬虫实例 动态ip+抓包+验证码自动识别,python爬虫
- Python中应用SQL及SQLAlchemy(一),pythonsqlalchemy,以SQLit3为
- 基于python的知乎开源爬虫 zhihu_oauth使用介绍,pythonzhi
评论关闭