CentOS下nginx+python+fastcgi+postgres部署总结(django版),,最近因为项目上的需要
CentOS下nginx+python+fastcgi+postgres部署总结(django版),,最近因为项目上的需要
最近因为项目上的需要开始大量使用nginx,因此也想趁机将以前常用的django+apache的架构换成django+nginx。常见的 django webapp 部署方式采用FCGI 或 WSGI的方式部署,在这里主要对CentOS 6.5下采用 Nginx + fastcgi + Python + Django + PostgreSQL 的搭建与配置步骤做一个简要说明,主要留作备忘,也希望对大家有所帮助。
一、PostgreSQL、Django、Nginx安装
postgres、Django、Nginx的安装在这里不详细讲述了,需要安装的可以去百度、Google一下。
二、PostgreSQL数据库配置
1、创建新用户:createuser -P 用户名
=> su postgres
bash-4.1$ createuser -P djangoEnter password for new role: Enter it again: Shall the new role be a superuser? (y/n) nShall the new role be allowed to create databases? (y/n) yShall the new role be allowed to create more new roles? (y/n) n2、为新用户创建新数据库:createdb 数据库名 -O 用户名
bash-4.1$ createdb djangodb -O djangobash-4.1$ psql psql (8.4.20)Type "help" for help.postgres=# \l
二、PostgreSQL + Django配置
1、创建Django项目
[email protected] 11:25:39 /App/django-websites => python /usr/bin/django-admin.py startproject websites[email protected] 11:25:19 /App/django-websites => tree websites/websites/├── manage.py└── websites ├── __init__.py ├── __init__.pyc ├── settings.py ├── settings.pyc ├── urls.py ├── urls.pyc ├── wsgi.py └── wsgi.pyc1 directory, 9 files
2、配置Django+Postgres
[email protected] 11:28:34 /App/django-websites/websites/websites => vi settings.py"""Django settings for websites project.For more information on this file, seehttps://docs.djangoproject.com/en/1.6/topics/settings/For the full list of settings and their values, seehttps://docs.djangoproject.com/en/1.6/ref/settings/"""# Build paths inside the project like this: os.path.join(BASE_DIR, ...)import osBASE_DIR = os.path.dirname(os.path.dirname(__file__))# Quick-start development settings - unsuitable for production# See https://docs.djangoproject.com/en/1.6/howto/deployment/checklist/# SECURITY WARNING: keep the secret key used in production secret!SECRET_KEY = ‘tpq!izqrqcr#[email protected]#[email protected]^p*!0ww&[email protected]%c#u0if‘# SECURITY WARNING: don‘t run with debug turned on in production!DEBUG = TrueTEMPLATE_DEBUG = TrueTEMPLATE_DIRS = (‘/App/django-websites/Templates/‘,) #设置Django模板路径ALLOWED_HOSTS = []# Application definitionINSTALLED_APPS = ( ‘django.contrib.admin‘, ‘django.contrib.auth‘, ‘django.contrib.contenttypes‘, ‘django.contrib.sessions‘, ‘django.contrib.messages‘, ‘django.contrib.staticfiles‘,)MIDDLEWARE_CLASSES = ( ‘django.contrib.sessions.middleware.SessionMiddleware‘, ‘django.middleware.common.CommonMiddleware‘, ‘django.middleware.csrf.CsrfViewMiddleware‘, ‘django.contrib.auth.middleware.AuthenticationMiddleware‘, ‘django.contrib.messages.middleware.MessageMiddleware‘, ‘django.middleware.clickjacking.XFrameOptionsMiddleware‘,)ROOT_URLCONF = ‘websites.urls‘WSGI_APPLICATION = ‘websites.wsgi.application‘# Database# https://docs.djangoproject.com/en/1.6/ref/settings/#databasesDATABASES = { ‘default‘: { #‘ENGINE‘: ‘django.db.backends.sqlite3‘, #‘NAME‘: os.path.join(BASE_DIR, ‘db.sqlite3‘), ‘ENGINE‘ : ‘django.db.backends.postgresql_psycopg2‘, # Django使用postgres数据库 ‘NAME‘: ‘djangodb‘, # 数据库名字 ‘USER‘: ‘django‘, # 数据库所有者 ‘PASSWORD‘: ‘123456‘, # 数据库密码 ‘HOST‘ : ‘localhost‘, ‘PORT‘ : ‘‘ }}# Internationalization# https://docs.djangoproject.com/en/1.6/topics/i18n/LANGUAGE_CODE = ‘en-us‘TIME_ZONE = ‘UTC‘USE_I18N = TrueUSE_L10N = TrueUSE_TZ = True# Static files (CSS, JavaScript, Images)# https://docs.djangoproject.com/en/1.6/howto/static-files/STATIC_URL = ‘/static/‘ 3、同步后台数据库
[email protected] 13:10:37 /App/django-websites/websites => python manage.py syncdbCreating tables ...Installing custom SQL ...Installing indexes ...Installed 0 object(s) from 0 fixture(s)
三、Nginx + Django + fastcgi配置
1.安装flup模块
nginx 默认已经整合了mod_fastcgi,所以在配置前先要安装flup。CentOS下可以通过一下命令直接安装:
=> yum install python-flup
2.修改nginx的配置文件:
server { listen 80; server_name 172.16.43.35; add_header X-Frame-Options SAMEORIGIN; add_header X-XSS-Protection "1;mode=block"; server_tokens off; # nginx 默认的CSS、JavaScript、Images指向 location /static { alias /usr/lib/python2.6/site-packages/django/contrib/admin/static/; } location / { fastcgi_pass 127.0.0.1:8051; fastcgi_param PATH_INFO $fastcgi_script_name; fastcgi_param REQUEST_METHOD $request_method; fastcgi_param QUERY_STRING $query_string; fastcgi_param CONTENT_TYPE $content_type; fastcgi_param CONTENT_LENGTH $content_length; fastcgi_param REMOTE_ADDR $remote_addr; fastcgi_param SERVER_PROTOCOL $server_protocol; fastcgi_param SERVER_PORT $server_port; fastcgi_param SERVER_NAME $server_name; fastcgi_pass_header Authorization; fastcgi_intercept_errors off; } }
3.到项目目录下,运行:
python manage.py runfcgi method=threaded host=127.0.0.1 port=8051
4.重启nginx服务器
=> /usr/local/nginx/sbin/nginx -s reload
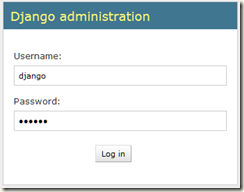
5.访问http://localhost/admin/,(如,本次部署的个人机器ip为172.16.43.35,即访问:http://172.16.43.35/admin/) 即可出现Django的后台数据库的登录页面(下左),以及登录进去后的djangodb页面(下右):


至此,CentOS下nginx+python+fastcgi+postgres的设置已经全部完成,接下来大家就可以尽情的去搭建自己的Django APP啦!
CentOS下nginx+python+fastcgi+postgres部署总结(django版)
相关内容
- 暂无相关文章
评论关闭