Python 爬虫二,,requests模块
Python 爬虫二,,requests模块
requests模块
beautifulsoup模块
Request模块
get方法请求
整体演示一下:
import requestsresponse = requests.get("https://www.baidu.com")print(type(response))print(response.status_code)print(type(response.text))print(response.text)print(response.cookies)print(response.content) # 二进制print(response.content.decode("utf-8"))我们可以看出response使用起来确实非常方便,这里有个问题需要注意一下:
很多情况下的网站如果直接response.text会出现乱码的问题,所以这个使用response.content
这样返回的数据格式其实是二进制格式,然后通过decode()转换为utf-8,这样就解决了通过response.text直接返回显示乱码的问题.
请求发出后,Requests 会基于 HTTP 头部对响应的编码作出有根据的推测。当你访问 response.text 之时,Requests 会使用其推测的文本编码。你可以找出 Requests 使用了什么编码,并且能够使用 response.encoding 属性来改变它.如:
import requestsresponse = requests.get( url=‘https://www.autohome.com.cn/news/‘)response.encoding = response.apparent_encoding # 使用默认的编码原则print(response.text)
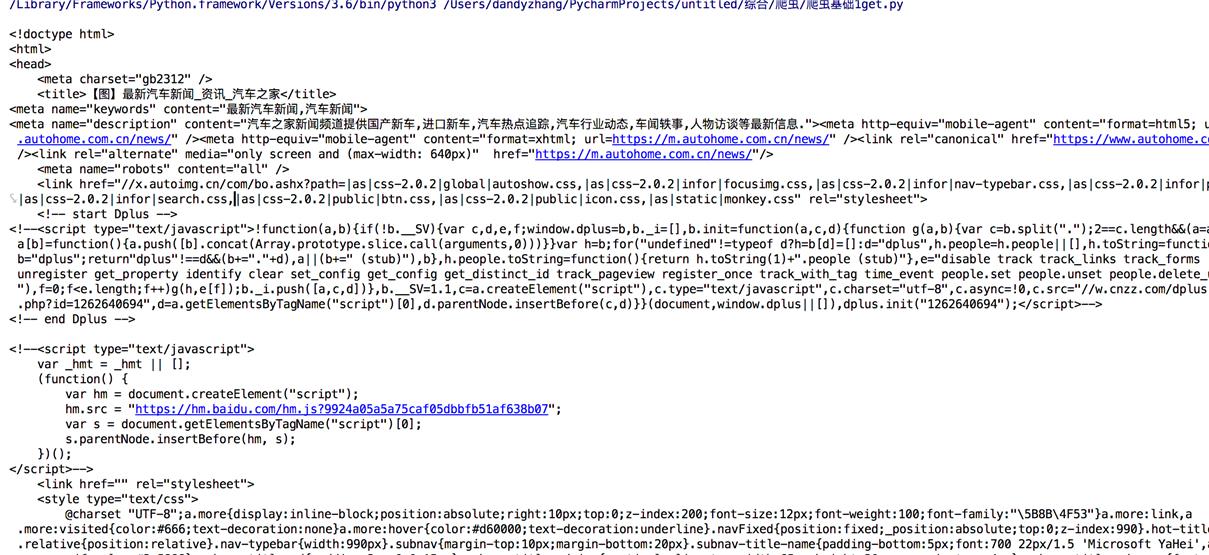
一个简单的get请求的爬虫结果:
如果我们想要在URL查询字符串传递数据,通常我们会通过httpbin.org/get?key=val方式传递。Requests模块允许使用params关键字传递参数,以一个字典来传递这些参数,格式如下:
# 实例方法一import requestsresponse = requests.get("url?name=dandy&age=18")print(response.text)# 实例方法二import requestsurl = ‘‘data = { "name":"dandy", "age":18}response = requests.get(url,params=data)print(response.url)print(response.text)上述两种的结果是相同的,通过params参数传递一个字典内容,从而直接构造url
注意:第二种方式通过字典的方式的时候,如果字典中的参数为None则不会添加到url上
获取二进制数据
在上面提到了response.content,这样获取的数据是二进制数据,同样的这个方法也可以用于下载图片以及
视频资源
添加headers
和前面我们将urllib模块的时候一样,我们同样可以定制headers的信息,如当我们直接通过requests请求知乎网站的时候,默认是无法访问的。谷歌浏览器里输入chrome://version,就可以看到用户代理,将用户代理添加到头部信息:
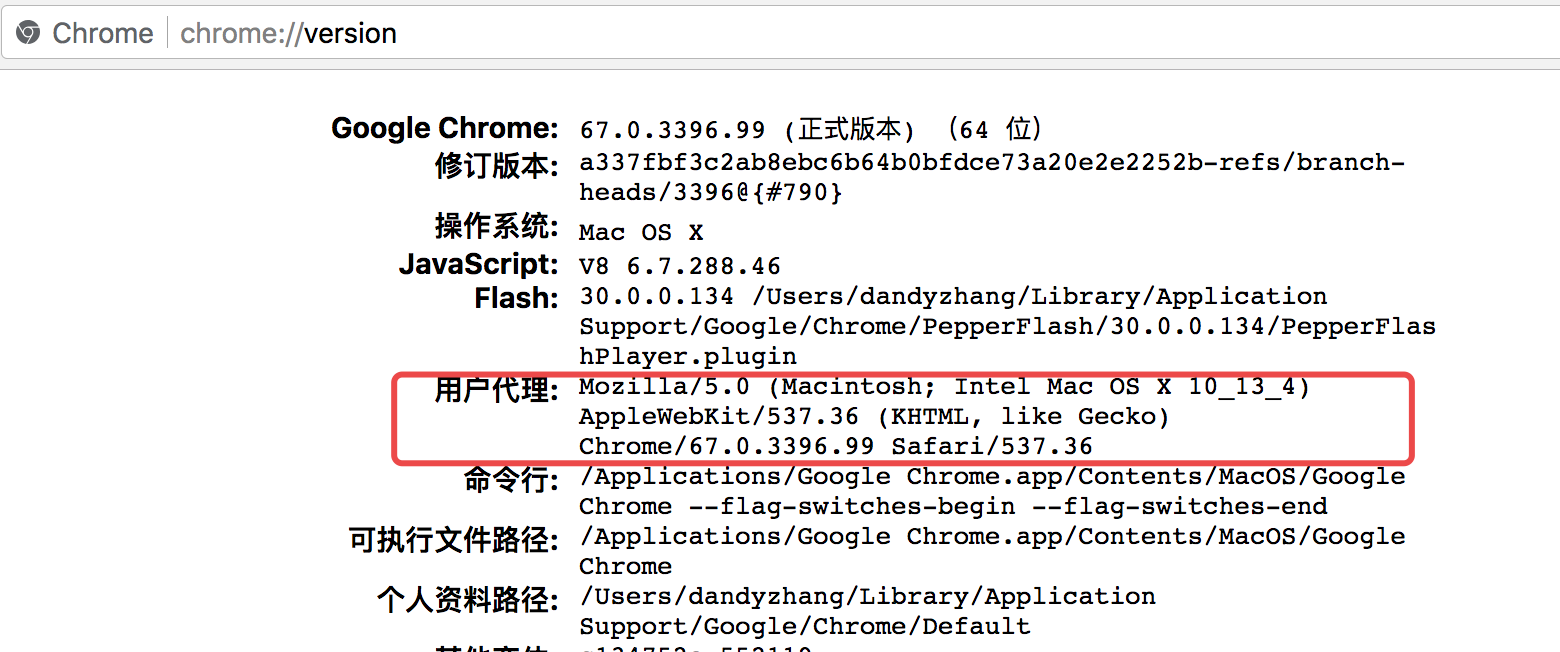
也可以随便输入一个网址:
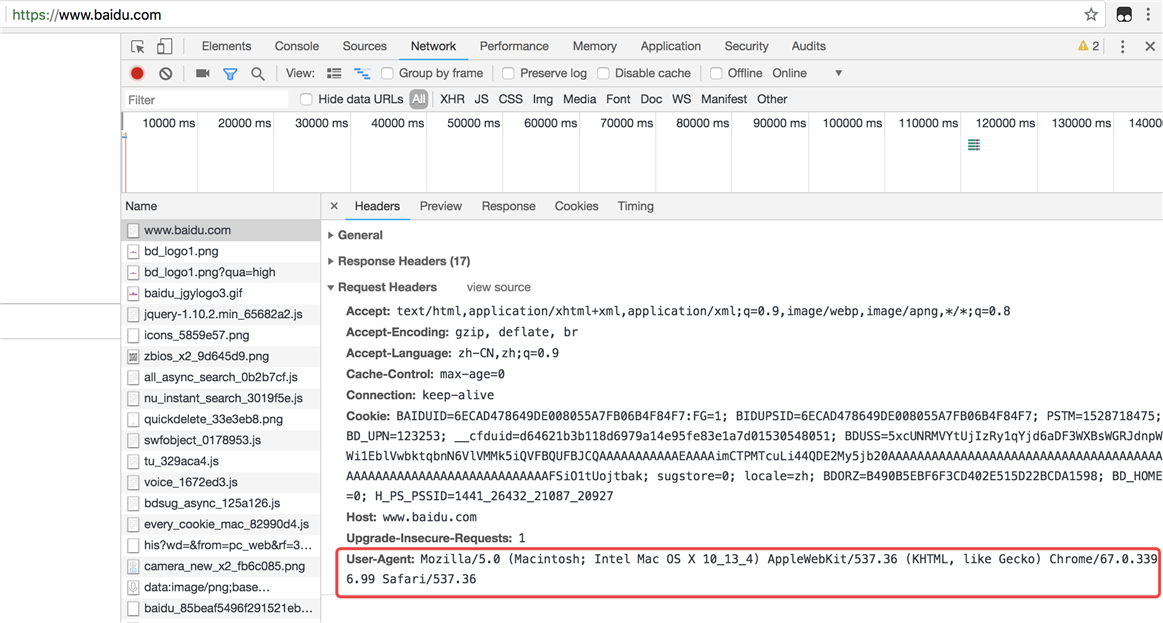
都可以获取到。
copy出来仿造的请求头信息
import requestsurl = ‘‘headers = { "User-Agent":"Mozilla/5.0 (Macintosh; Intel Mac OS X 10_13_4) AppleWebKit/537.36 (KHTML, like Gecko) Chrome/67.0.3396.99 Safari/537.36"}response =requests.get(url,headers=headers)print(response.text)post请求
通过在发送post请求时添加一个data参数,这个data参数可以通过字典构造成,这样
对于发送post请求就非常方便
import requestsurl = ‘‘data = { "name":"dandy", "age":18}response = requests.post(url,data=data)print(response.text)同样的在发送post请求的时候也可以和发送get请求一样通过headers参数传递一个字典类型的数据
模拟登陆&自动点赞
首先打开抽屉,点击登陆,打开开发者模式,随意的输入账号密码,然后点击登陆,可以的到如下的图:
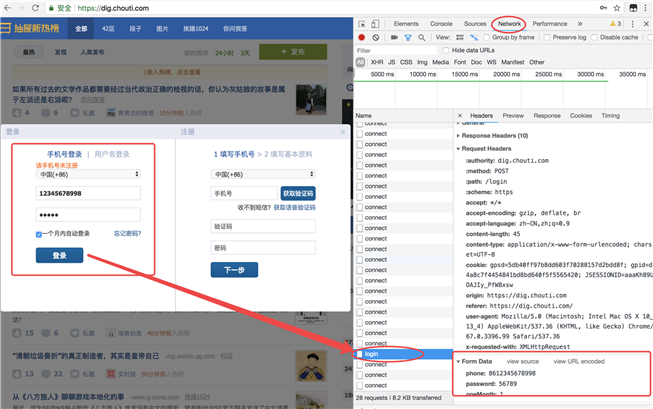
备注:之前抽屉是不会去抓去请求头的终端设备信息的,现在有验证了,0.0
首先需要大佬们去注册一下账号密码,然后我们来模拟浏览器登陆,这里需要注意的一点是,登陆的时候可以注意一下,如果浏览器刷新了,那肯定是form验证,如果没有那就一定是ajax验证。所以这里不用说,测试一下就发现是ajax验证:
import requestsheaders = { "User-Agent":"Mozilla/5.0 (Macintosh; Intel Mac OS X 10_13_4) AppleWebKit/537.36 (KHTML, like Gecko) Chrome/67.0.3396.99 Safari/537.36"} # header里伪造终端信息post_dict = { ‘phone‘: ‘8615988888888‘, ‘password‘: ‘*******‘, ‘oneMonth‘: 1}response = requests.post( url=‘https://dig.chouti.com/login‘, data=post_dict, headers=headers)print(response.content)cookie_dict = response.cookies.get_dict()print(cookie_dict)这里,既然是ajax登陆,返回的可以猜到一定是json数据:
b‘{"result":{"code":"9999", "message":"", "data":{"complateReg":"0","destJid":"cdu_51970753537"}}}‘{‘gpsd‘: ‘4fa04e9978e550f8d6ea1fb5418184ee‘, ‘puid‘: ‘c3c133fab0b2ba4bcb5e0f9b494501cd‘, ‘JSESSIONID‘: ‘aaahPA3kgUc2yhWM_9xsw‘}到现在为止,已经顺利的实现了登陆功能,然后实现了,大家应该都知道为什么要抓取一下cookies打印出来吧?
cookies的真正的意义就是在于当第一次登陆完,之后就可以直接带着服务器返回的cookies去向服务器发送请求。之后就可以肆意妄为了!!!
现在我们来实现一下自动点赞的功能,首先找一篇文章,点个赞:
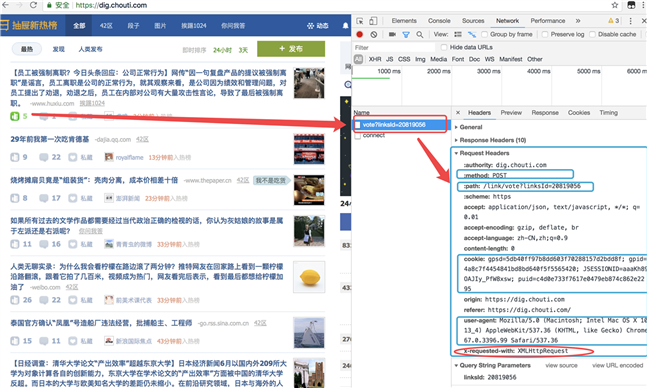
由上,可以发现点赞的网址,post的数据等,此时取消点赞,写代码:
import requestsheaders = { "User-Agent":"Mozilla/5.0 (Macintosh; Intel Mac OS X 10_13_4) AppleWebKit/537.36 (KHTML, like Gecko) Chrome/67.0.3396.99 Safari/537.36"}post_dict = { ‘phone‘: ‘8615962180289‘, ‘password‘: ‘zhangy321281‘, ‘oneMonth‘: 1}response = requests.post( url=‘https://dig.chouti.com/login‘, data=post_dict, headers=headers)print(response.content)cookie_dict = response.cookies.get_dict()print(cookie_dict)response_vote = requests.post( url=‘https://dig.chouti.com/link/vote?linksId=20819056‘, cookies=cookie_dict)print(response_vote)信心满满写好了:
b‘{"result":{"code":"9999", "message":"", "data":{"complateReg":"0","destJid":"cdu_51970753537"}}}‘{‘gpsd‘: ‘74338b2cda9e9a355a52854b95474e3a‘, ‘puid‘: ‘07fd1754895aefa93b4b46fb52990f7f‘, ‘JSESSIONID‘: ‘aaavRXk12M4Kidy5_9xsw‘}<Response [403]>什么??怎么会这样??拿着浏览器返回的cookie怎么不可以呢?那该怎么办?
管不了那么多,先用笨方法来测试cookies里面哪一个控制这登陆状态认证:
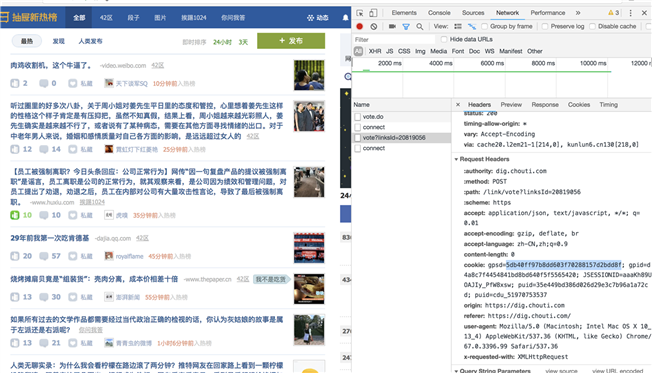
取消点赞,重新测试代码点赞:
import requestsheaders = { "User-Agent":"Mozilla/5.0 (Macintosh; Intel Mac OS X 10_13_4) AppleWebKit/537.36 (KHTML, like Gecko) Chrome/67.0.3396.99 Safari/537.36"}response = requests.post( url=‘https://dig.chouti.com/link/vote?linksId=20819056‘, cookies={ ‘gpsd‘: ‘5db40ff97b8dd603f70288157d2bdd8f‘ # 因为没办法,所以只能用浏览器的cookies做验证,一次次取一个值 }, headers=headers)print(response.text)测试结果:
{"result":{"code":"9999", "message":"推荐成功", "data":{"jid":"cdu_51970753537","likedTime":"1531564084343000","lvCount":"10","nick":"衰Zzz","uvCount":"1","voteTime":"小于1分钟前"}}}天呐!!!成功了!!!
所以我们可以先跟踪确定了,肯定是gpsd有问题。
这时候退出登陆重新刷新网页:
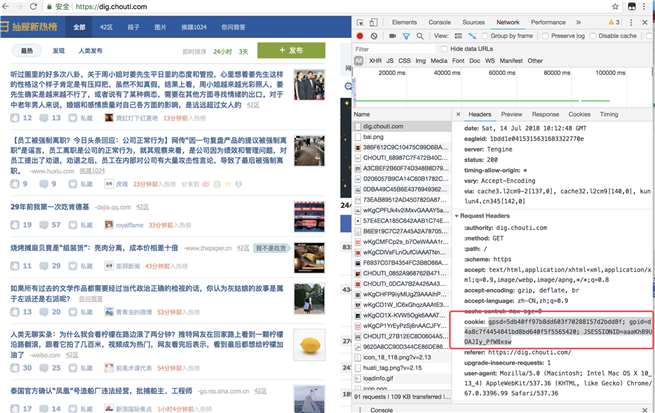
记录一下cookies:
cookie: gpsd=5db40ff97b8dd603f70288157d2bdd8f; gpid=d4a8c7f4454841bd8bd640f5f5565420; JSESSIONID=aaaKh89UOAJIy_PfW8xsw
不免有些疑问,为什么第一次get就有cookies,
此时我们再用代码测试一下gpsd的值:
import requestsheaders = { "User-Agent":"Mozilla/5.0 (Macintosh; Intel Mac OS X 10_13_4) AppleWebKit/537.36 (KHTML, like Gecko) Chrome/67.0.3396.99 Safari/537.36"}response_get = requests.get( url=‘https://dig.chouti.com/‘, headers=headers)print(response_get.cookies.get_dict())post_dict = { ‘phone‘: ‘8615988888888‘, ‘password‘: ‘********‘, ‘oneMonth‘: 1}response_post = requests.post( url=‘https://dig.chouti.com/login‘, data=post_dict, headers=headers)print(response_post.content)cookie_dict = response_post.cookies.get_dict()print(cookie_dict)查看cookies对比:
{‘gpsd‘: ‘38644be424cebb27e1cc631dd84ae9d2‘, ‘JSESSIONID‘: ‘aaaKwMAE52emjedIW-xsw‘}b‘{"result":{"code":"9999", "message":"", "data":{"complateReg":"0","destJid":"cdu_51970753537"}}}‘{‘gpsd‘: ‘7b32421f6a73365b2dbb6b9739afaaff‘, ‘puid‘: ‘497b5a7249b8538e70ac87ead562c91f‘, ‘JSESSIONID‘: ‘aaa5sbGP7XecWf15W8xsw‘}发现两次的gpsd不一致,从web开发者角度登陆之后的cookies一定是不会再去进行改变,所以前后一共就有这么两种可能性的cookies,上面的点赞失败了,那就代表返回的cookies一定是没有用的:
那是不是可以猜想认证的gpsd会不会是第一次的gpsd值,但是一想又不太可能,因为第一次的还没有认证,怎么能保证呢?那会不会是第一次的gpsd再登陆的时候传过去做了认证,然后浏览器记录了它,但是为了防止爬虫做了一份假的gpsd给你,想到这里不免想测试一下:
import requestsheaders = { "User-Agent": "Mozilla/5.0 (Macintosh; Intel Mac OS X 10_13_4) AppleWebKit/537.36 (KHTML, like Gecko) Chrome/67.0.3396.99 Safari/537.36"}response_get = requests.get( url=‘https://dig.chouti.com/‘, headers=headers)r1 = response_get.cookies.get_dict() # 第一次get请求获取服务器给的cookiespost_dict = { ‘phone‘: ‘8615988888888‘, ‘password‘: ‘********‘, ‘oneMonth‘: 1,}response_post = requests.post( url=‘https://dig.chouti.com/login‘, data=post_dict, headers=headers, cookies=r1 # 第二次再把第一次得到的cookies传回去进行认证授权)print(response_post.content)r2 = response_post.cookies.get_dict() # 这个是个骗子!!!response_vote = requests.post( url=‘https://dig.chouti.com/link/vote?linksId=20819056‘, cookies={ ‘gpsd‘: r1[‘gpsd‘] }, headers=headers)print(response_vote.text)测试结果:
b‘{"result":{"code":"9999", "message":"", "data":{"complateReg":"0","destJid":"cdu_51970753537"}}}‘{"result":{"code":"9999", "message":"推荐成功", "data":{"jid":"cdu_51970753537","likedTime":"1531565602774000","lvCount":"16","nick":"衰Zzz","uvCount":"1","voteTime":"小于1分钟前"}}}
完成!!
响应
我们可以通过response获得很多属性,例子如下
import requestsresponse = requests.get("http://www.baidu.com")print(type(response.status_code),response.status_code)print(type(response.headers),response.headers)print(type(response.cookies),response.cookies)print(type(response.url),response.url)print(type(response.history),response.history)状态码判断
Requests还附带了一个内置的状态码查询对象
主要有如下内容:
100: (‘continue‘,),
101: (‘switching_protocols‘,),
102: (‘processing‘,),
103: (‘checkpoint‘,),
122: (‘uri_too_long‘, ‘request_uri_too_long‘),
200: (‘ok‘, ‘okay‘, ‘all_ok‘, ‘all_okay‘, ‘all_good‘, ‘\o/‘, ‘?‘),
201: (‘created‘,),
202: (‘accepted‘,),
203: (‘non_authoritative_info‘, ‘non_authoritative_information‘),
204: (‘no_content‘,),
205: (‘reset_content‘, ‘reset‘),
206: (‘partial_content‘, ‘partial‘),
207: (‘multi_status‘, ‘multiple_status‘, ‘multi_stati‘, ‘multiple_stati‘),
208: (‘already_reported‘,),
226: (‘im_used‘,),
Redirection.
300: (‘multiple_choices‘,),
301: (‘moved_permanently‘, ‘moved‘, ‘\o-‘),
302: (‘found‘,),
303: (‘see_other‘, ‘other‘),
304: (‘not_modified‘,),
305: (‘use_proxy‘,),
306: (‘switch_proxy‘,),
307: (‘temporary_redirect‘, ‘temporary_moved‘, ‘temporary‘),
308: (‘permanent_redirect‘,
‘resume_incomplete‘, ‘resume‘,), # These 2 to be removed in 3.0
Client Error.
400: (‘bad_request‘, ‘bad‘),
401: (‘unauthorized‘,),
402: (‘payment_required‘, ‘payment‘),
403: (‘forbidden‘,),
404: (‘not_found‘, ‘-o-‘),
405: (‘method_not_allowed‘, ‘not_allowed‘),
406: (‘not_acceptable‘,),
407: (‘proxy_authentication_required‘, ‘proxy_auth‘, ‘proxy_authentication‘),
408: (‘request_timeout‘, ‘timeout‘),
409: (‘conflict‘,),
410: (‘gone‘,),
411: (‘length_required‘,),
412: (‘precondition_failed‘, ‘precondition‘),
413: (‘request_entity_too_large‘,),
414: (‘request_uri_too_large‘,),
415: (‘unsupported_media_type‘, ‘unsupported_media‘, ‘media_type‘),
416: (‘requested_range_not_satisfiable‘, ‘requested_range‘, ‘range_not_satisfiable‘),
417: (‘expectation_failed‘,),
418: (‘im_a_teapot‘, ‘teapot‘, ‘i_am_a_teapot‘),
421: (‘misdirected_request‘,),
422: (‘unprocessable_entity‘, ‘unprocessable‘),
423: (‘locked‘,),
424: (‘failed_dependency‘, ‘dependency‘),
425: (‘unordered_collection‘, ‘unordered‘),
426: (‘upgrade_required‘, ‘upgrade‘),
428: (‘precondition_required‘, ‘precondition‘),
429: (‘too_many_requests‘, ‘too_many‘),
431: (‘header_fields_too_large‘, ‘fields_too_large‘),
444: (‘no_response‘, ‘none‘),
449: (‘retry_with‘, ‘retry‘),
450: (‘blocked_by_windows_parental_controls‘, ‘parental_controls‘),
451: (‘unavailable_for_legal_reasons‘, ‘legal_reasons‘),
499: (‘client_closed_request‘,),
Server Error.
500: (‘internal_server_error‘, ‘server_error‘, ‘/o\‘, ‘?‘),
501: (‘not_implemented‘,),
502: (‘bad_gateway‘,),
503: (‘service_unavailable‘, ‘unavailable‘),
504: (‘gateway_timeout‘,),
505: (‘http_version_not_supported‘, ‘http_version‘),
506: (‘variant_also_negotiates‘,),
507: (‘insufficient_storage‘,),
509: (‘bandwidth_limit_exceeded‘, ‘bandwidth‘),
510: (‘not_extended‘,),
511: (‘network_authentication_required‘, ‘network_auth‘, ‘network_authentication‘),
通过下面例子测试:(不过通常还是通过状态码判断更方便)
import requestsresponse= requests.get("http://www.baidu.com")if response.status_code == requests.codes.ok: print("访问成功")BeautifulSoup模块
安装:
pip install beautifulsoup4
在python自动化模块对bs已经简单介绍了。这里直接看快速使用:
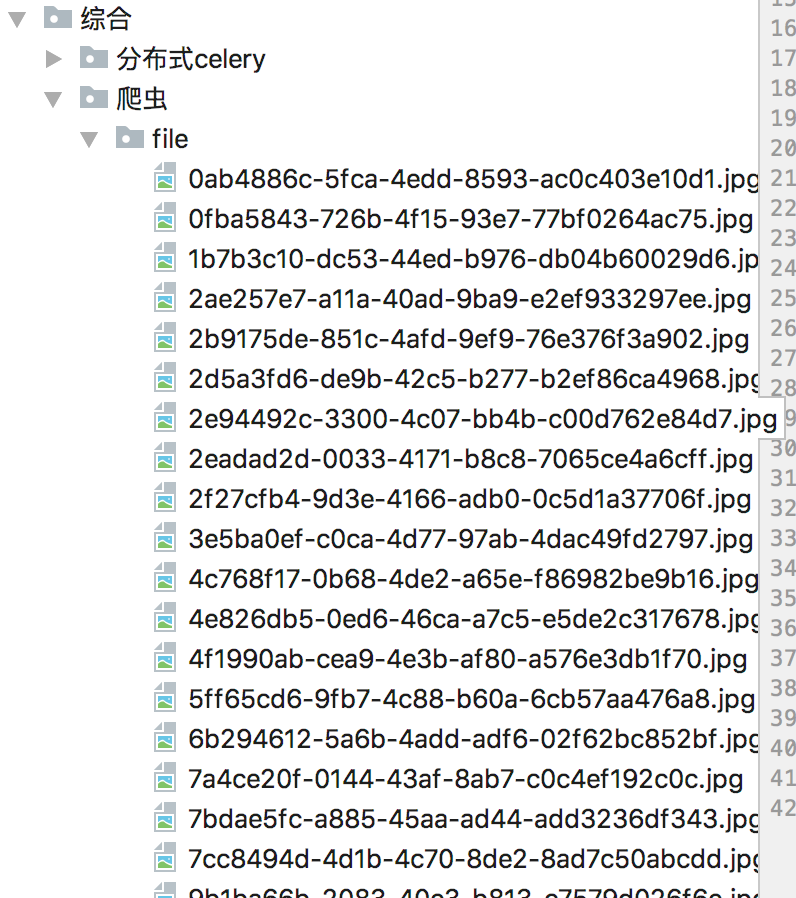
import requestsfrom bs4 import BeautifulSoupimport osresponse = requests.get( # get请求 url=‘https://www.autohome.com.cn/news/‘)response.encoding = response.apparent_encoding # 使用默认的编码原则soup = BeautifulSoup(response.text, features=‘html.parser‘) # 实例化soup对象的两种参数方式# soup = BeautifulSoup(response.text, features=‘lxml‘)# print(response.text)target = soup.find(id=‘auto-channel-lazyload-article‘) # 取指定id的对象# obj = target.find(‘li‘) # 找到第一个lili_list = target.find_all(‘li‘) # 找到所有的li, 是一个列表,里面是bs对象for i in li_list: # 遍历li的列表内对象 a = i.find(‘a‘) if a: # print(a.attrs) # {‘href‘: ‘//www.autohome.com.cn/news/201807/919525.html#pvareaid=102624‘} # print(a.attrs.get(‘href‘)) # txt = a.find(‘h3‘) # 本质上是对象,但是打印出来是字符串 txt = a.find(‘h3‘).txt # 提取内部字符串 print(txt) img_url = a.find(‘img‘).attrs.get(‘src‘) img_url = img_url.strip(‘//‘) # src ==> //www.autohome.com.cn/**********/***.jpg print(img_url) img_type = img_url.split(‘.‘)[-1] print(img_type) img_response = requests.get(url=‘http://‘ + img_url) # 对于img的路径再次发送get请求 import uuid with open(os.path.join(‘file‘, str(uuid.uuid4()) + ‘.‘ + img_type), ‘wb‘) as f: f.write(img_response.content) # 二进制文件写入文件句柄内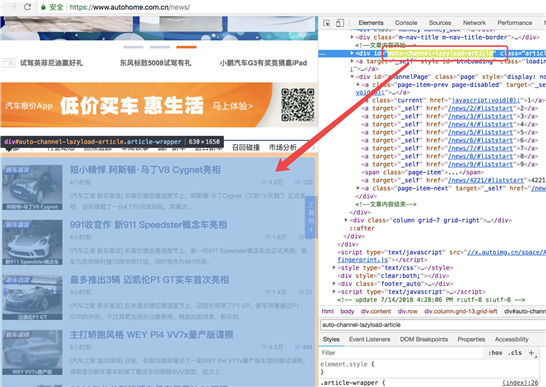
此段代码,定向的抓去了目的div的内部a标签的资源,循环发送get请求抓去处图片保存到了本地:
解析器
Beautiful Soup支持Python标准库中的HTML解析器,还支持一些第三方的解析器,如果我们不安装它,则 Python 会使用 Python默认的解析器,lxml 解析器更加强大,速度更快,推荐安装。
下面是常见解析器:
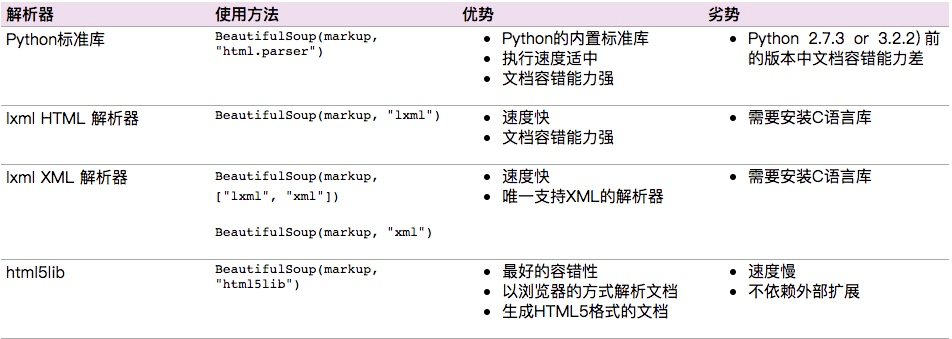
推荐使用lxml作为解析器,因为效率更高. 在Python2.7.3之前的版本和Python3中3.2.2之前的版本,必须安装lxml或html5lib, 因为那些Python版本的标准库中内置的HTML解析方法不够稳定.
基本使用
标签选择器
在快速使用中我们添加如下代码:
print(soup.title)
print(type(soup.title))
print(soup.head)
print(soup.p)
通过这种soup.标签名 我们就可以获得这个标签的内容
这里有个问题需要注意,通过这种方式获取标签,如果文档中有多个这样的标签,返回的结果是第一个标签的内容,如上面我们通过soup.p获取p标签,而文档中有多个p标签,但是只返回了第一个p标签内容
获取名称
当我们通过soup.title.name的时候就可以获得该title标签的名称,即title
获取属性
print(soup.p.attrs[‘name‘])
print(soup.p[‘name‘])
上面两种方式都可以获取p标签的name属性值
获取内容
print(soup.p.string)
结果就可以获取第一个p标签的内容:
The Dormouse‘s story
嵌套选择
我们直接可以通过下面嵌套的方式获取
print(soup.head.title.string)
子节点和子孙节点
contents的使用
通过下面例子演示:
html = """<html> <head> <title>The Dormouse‘s story</title> </head> <body> <p class="story"> Once upon a time there were three little sisters; and their names were <a href="http://example.com/elsie" class="sister" id="link1"> <span>Elsie</span> </a> <a href="http://example.com/lacie" class="sister" id="link2">Lacie</a> and <a href="http://example.com/tillie" class="sister" id="link3">Tillie</a> and they lived at the bottom of a well. </p> <p class="story">...</p>"""from bs4 import BeautifulSoupsoup = BeautifulSoup(html,‘lxml‘)print(soup.p.contents)
结果是将p标签下的所有子标签存入到了一个列表中
列表中会存入如下元素:
[‘\n Once upon a time there were three little sisters; and their names were\n ‘, <a class="sister" href="http://example.com/elsie" id="link1"><span>Elsie</span></a>, ‘\n‘, <a class="sister" href="http://example.com/lacie" id="link2">Lacie</a>, ‘\n and\n ‘, <a class="sister" href="http://example.com/tillie" id="link3">Tillie</a>, ‘\n and they lived at the bottom of a well.\n ‘]
children的使用
通过下面的方式也可以获取p标签下的所有子节点内容和通过contents获取的结果是一样的,但是不同的地方是soup.p.children是一个迭代对象,而不是列表,只能通过循环的方式获取素有的信息
print(soup.p.children)for i,child in enumerate(soup.p.children): print(i,child)
通过contents以及children都是获取子节点,如果想要获取子孙节点可以通过descendants
print(soup.descendants)同时这种获取的结果也是一个迭代器
父节点和祖先节点
通过soup.a.parent就可以获取父节点的信息
通过list(enumerate(soup.a.parents))可以获取祖先节点,这个方法返回的结果是一个列表,会分别将a标签的父节点的信息存放到列表中,以及父节点的父节点也放到列表中,并且最后还会讲整个文档放到列表中,所有列表的最后一个元素以及倒数第二个元素都是存的整个文档的信息
兄弟节点
soup.a.next_siblings 获取后面的兄弟节点
soup.a.previous_siblings 获取前面的兄弟节点
soup.a.next_sibling 获取下一个兄弟标签
souo.a.previous_sinbling 获取上一个兄弟标签
标准选择器
find_all
find_all(name,attrs,recursive,text,**kwargs)
可以根据标签名,属性,内容查找文档
name的用法
html=‘‘‘<div class="panel"> <div class="panel-heading"> <h4>Hello</h4> </div> <div class="panel-body"> <ul class="list" id="list-1"> <li class="element">Foo</li> <li class="element">Bar</li> <li class="element">Jay</li> </ul> <ul class="list list-small" id="list-2"> <li class="element">Foo</li> <li class="element">Bar</li> </ul> </div></div>‘‘‘from bs4 import BeautifulSoupsoup = BeautifulSoup(html, ‘lxml‘)print(soup.find_all(‘ul‘))print(type(soup.find_all(‘ul‘)[0]))
结果返回的是一个列表的方式:
[<ul class="list" id="list-1"><li class="element">Foo</li><li class="element">Bar</li><li class="element">Jay</li></ul>, <ul class="list list-small" id="list-2"><li class="element">Foo</li><li class="element">Bar</li></ul>]<class ‘bs4.element.Tag‘>
同时我们是可以针对结果再次find_all,从而获取所有的li标签信息:
for ul in soup.find_all(‘ul‘): print(ul.find_all(‘li‘))
[<li class="element">Foo</li>, <li class="element">Bar</li>, <li class="element">Jay</li>][<li class="element">Foo</li>, <li class="element">Bar</li>]
attrs
例子如下:
html=‘‘‘<div class="panel"> <div class="panel-heading"> <h4>Hello</h4> </div> <div class="panel-body"> <ul class="list" id="list-1" name="elements"> <li class="element">Foo</li> <li class="element">Bar</li> <li class="element">Jay</li> </ul> <ul class="list list-small" id="list-2"> <li class="element">Foo</li> <li class="element">Bar</li> </ul> </div></div>‘‘‘from bs4 import BeautifulSoupsoup = BeautifulSoup(html, ‘html.parser‘)print(soup.find_all(attrs={‘id‘: ‘list-1‘}))print(soup.find_all(attrs={‘name‘: ‘elements‘}))[<ul class="list" id="list-1" name="elements"><li class="element">Foo</li><li class="element">Bar</li><li class="element">Jay</li></ul>][<ul class="list" id="list-1" name="elements"><li class="element">Foo</li><li class="element">Bar</li><li class="element">Jay</li></ul>]
attrs可以传入字典的方式来查找标签,但是这里有个特殊的就是class,因为class在python中是特殊的字段,所以如果想要查找class相关的可以更改attrs={‘class_‘:‘element‘}或者soup.find_all(‘‘,{"class":"element}),特殊的标签属性可以不写attrs,例如id
text
例子如下:
html=‘‘‘<div class="panel"> <div class="panel-heading"> <h4>Hello</h4> </div> <div class="panel-body"> <ul class="list" id="list-1"> <li class="element">Foo</li> <li class="element">Bar</li> <li class="element">Jay</li> </ul> <ul class="list list-small" id="list-2"> <li class="element">Foo</li> <li class="element">Bar</li> </ul> </div></div>‘‘‘from bs4 import BeautifulSoupsoup = BeautifulSoup(html, ‘html.parser‘)print(soup.find_all(text=‘Foo‘))
[‘Foo‘, ‘Foo‘] # 结果返回的是查到的所有的text=‘Foo‘的文本
find
find(name,attrs,recursive,text,**kwargs)
find返回的匹配结果的第一个元素
其他一些类似的用法:
find_parents()返回所有祖先节点,find_parent()返回直接父节点。
find_next_siblings()返回后面所有兄弟节点,find_next_sibling()返回后面第一个兄弟节点。
find_previous_siblings()返回前面所有兄弟节点,find_previous_sibling()返回前面第一个兄弟节点。
find_all_next()返回节点后所有符合条件的节点, find_next()返回第一个符合条件的节点
find_all_previous()返回节点后所有符合条件的节点, find_previous()返回第一个符合条件的节点
CSS选择器
通过select()直接传入CSS选择器就可以完成选择
熟悉前端的人对CSS可能更加了解,其实用法也是一样的
.表示class #表示id
标签1,标签2 找到所有的标签1和标签2
标签1 标签2 找到标签1内部的所有的标签2
[attr] 可以通过这种方法找到具有某个属性的所有标签
[atrr=value] 例子[target=_blank]表示查找所有target=_blank的标签
html=‘‘‘<div class="panel"> <div class="panel-heading"> <h4>Hello</h4> </div> <div class="panel-body"> <ul class="list" id="list-1"> <li class="element">Foo</li> <li class="element">Bar</li> <li class="element">Jay</li> </ul> <ul class="list list-small" id="list-2"> <li class="element">Foo</li> <li class="element">Bar</li> </ul> </div></div>‘‘‘from bs4 import BeautifulSoupsoup = BeautifulSoup(html, ‘html.parser‘)print(soup.select(‘.panel .panel-heading‘))print(soup.select(‘ul li‘))print(soup.select(‘#list-2 .element‘))print(type(soup.select(‘ul‘)[0]))
结果:
[<div class="panel-heading"><h4>Hello</h4></div>][<li class="element">Foo</li>, <li class="element">Bar</li>, <li class="element">Jay</li>, <li class="element">Foo</li>, <li class="element">Bar</li>][<li class="element">Foo</li>, <li class="element">Bar</li>]<class ‘bs4.element.Tag‘>
获取内容
通过get_text()就可以获取文本内容
html=‘‘‘<div class="panel"> <div class="panel-heading"> <h4>Hello</h4> </div> <div class="panel-body"> <ul class="list" id="list-1"> <li class="element">Foo</li> <li class="element">Bar</li> <li class="element">Jay</li> </ul> <ul class="list list-small" id="list-2"> <li class="element">Foo</li> <li class="element">Bar</li> </ul> </div></div>‘‘‘from bs4 import BeautifulSoupsoup = BeautifulSoup(html, ‘html.parser‘)for li in soup.select(‘li‘): print(li.get_text())
获取属性
或者属性的时候可以通过[属性名]或者attrs[属性名]
html=‘‘‘<div class="panel"> <div class="panel-heading"> <h4>Hello</h4> </div> <div class="panel-body"> <ul class="list" id="list-1"> <li class="element">Foo</li> <li class="element">Bar</li> <li class="element">Jay</li> </ul> <ul class="list list-small" id="list-2"> <li class="element">Foo</li> <li class="element">Bar</li> </ul> </div></div>‘‘‘from bs4 import BeautifulSoupsoup = BeautifulSoup(html, ‘lxml‘)for ul in soup.select(‘ul‘): print(ul[‘id‘]) print(ul.attrs[‘id‘])
总结
推荐使用lxml解析库,必要时使用html.parser
标签选择筛选功能弱但是速度快
建议使用find()、find_all() 查询匹配单个结果或者多个结果
如果对CSS选择器熟悉建议使用select()
记住常用的获取属性和文本值的方法
Python 爬虫二
相关内容
- python -m xxx.py和python xxx.py的区别,,先看下python
- python模块以及导入出现ImportError: No module named ‘xxx‘问
- Python学习小记(2)---[list, iterator, and, or, zip, dict.keys],,
- Python、编译解释、动态库静态库、编译过程、头文件了
- python3下scrapy爬虫(第十四卷:scrapy+scrapy_redis+scrapyd打造
- Python 3.6 安装后需要安装的常用 {控件}?,python3.6
- Python常用模块之hashlib,pythonhashlib,Python里面的h
- python - 定时清理ES 索引,python清理es索引,只保留三天
- python重定向原理及实例,python重定向实例,1. 前言为了在
- python之图片文字识别,python文字识别,总体思路:
评论关闭