python中文件操作,python打开文件并写入,1.创建和打开文件(
python中文件操作,python打开文件并写入,1.创建和打开文件(
1.创建和打开文件
(1)打开模式:
r:以只读模式打开;r+:以读写模式打开;w:以只写模式打开(重写文件,不存在则创建)
w+:以读/写模式打开;a:只写模式(只允许在末尾追加);a+以读/写模式打开
>>> fo=open(‘test.txt‘)
>>> fo
<open file ‘test.txt‘, mode ‘r‘ at 0x0000000003AC3AE0>
>>> fo.read()
‘123‘
>>> fo=open(‘test.txt‘,‘w‘)
>>> fo
<open file ‘C:/Users/kite/Desktop/test.txt‘, mode ‘w‘ at 0x0000000003AC3AE0>
>>> fo.close()
(2)写文件(write()写入字符串、writelines()写入字符串序列)
>>> fo=open(‘test.txt‘,‘w‘)
>>> fo.write(‘english id ‘)
>>> fo=open(‘test.txt‘,‘w+‘)
>>> fo.writelines([‘I\n‘,‘learn\n‘,‘python\n‘])
>>> fo.read()
‘I\nlearn\npython\n‘
(3)保存和关闭文件(close()和flush())
a.结合异常机制确保文件关闭
>>> try:
... f=open(‘test.txt‘,‘w+‘))
... f.write(‘test‘)
... except BaseException as e:
... print(e)
... finally:
... f.close()
b.with语句自动管理上下文资源
>>> with open(‘test.txt‘,‘w+‘) as f:
... f.write(‘testtest‘)
(4)读文件
read(),读取并返回整个文件;
>>> with open(‘test.txt‘,‘r‘) as f:
... s=f.read()
... print(s)
...
testt\nest\ntest\ntes\nttesttest\nttttt
stesttesttestsstesttesttests\n
stesttesttestsstesttesttests\n
stesttesttests
readline(),只返回一行结果;
>>> with open(‘test.txt‘,‘r‘) as f:
... line=f.readline()
... print(line)
...
testt\nest\ntest\ntes\nttesttest\nttttt
readlines(),一次读取所有,返回一个列表
>>> with open(‘test.txt‘,‘r‘) as f:
... content=f.readlines()
... print(content)
...
[‘testt\\nest\\ntest\\ntes\\nttesttest\\nttttt\n‘, ‘stesttesttestsstesttesttests\\n\n‘, ‘stesttesttestsstesttesttests\\n\n‘, ‘stesttesttests‘]
2.文件读写位置
(1)tell(),返回文件当前位置
>>> fo=open(‘test.txt‘)
>>> fo.tell()
0L
>>> print(fo.read(5))
testt
>>> fo.tell()
5L
(2)seek(),移动文件读取指针到指定位置,实现文件随机读写
>>> fo.seek(5,0)
>>> fo.tell()
5L
>>> print(fo.read())
\nest\ntest\ntes\nttesttest\nttttt
stesttesttests
3.文件迭代器
每读取一行加载到内存中
>>> fo=open(‘test.txt‘)
>>> for line in fo:
... print(line)
...
testt\nest\ntest\ntes\nttesttest\nttttt
stestt
>>> fo=open(‘test.txt‘)
>>> for line in fo.readlines():
... print(line)
...
testt\nest\ntest\ntes\nttesttest\nttttt
stestt
4.copy模块(在定义类时,通过定义__copy__和__deepcopy__方法,可改变copy默认行为)
(1)浅拷贝copy.copy(只复制对象本身,未复制该对象所引用的对象)
>>> import copy
>>> a=[1,2,3,[‘a‘,‘b‘,‘c‘]]
>>> b=a
>>> c=copy.copy(a)
>>> c
[1, 2, 3, [‘a‘, ‘b‘, ‘c‘],‘e‘]
>>> a
[1, 2, 3, [‘a‘, ‘b‘, ‘c‘],‘e‘]
>>> c[3][0]=‘g‘
>>> c
[1, 2, 3, [‘g‘, ‘b‘, ‘c‘], ‘e‘]
>>> a
[1, 2, 3, [‘g‘, ‘b‘, ‘c‘], ‘e‘]
(2)深拷贝copy.deepcopy(复制对象及该对象所引用的对象)
>>> d=copy.deepcopy(b)
>>> b
[1, 2, 3, [‘a‘, ‘b‘, ‘c‘], ‘e‘]
>>> d
[1, 2, 3, [‘a‘, ‘b‘, ‘c‘], ‘e‘]
>>> d[3][1]=‘f‘
>>> d
[1, 2, 3, [‘a‘, ‘f‘, ‘c‘], ‘e‘]
>>> b
[1, 2, 3, [‘a‘, ‘b‘, ‘c‘], ‘e‘]
5.os模块
(1)创建目录(mkdir()/makedirs())
>>> import os
>>> os.mkdir(‘test‘)
>>> os.mkdirs(‘a/b/c‘)
(2)删除目录(rmdir()\removedirs())
>>> os.rmdir(‘test‘)
>>> os.removedirs(‘a/b/c‘)
(3)创建/删除文件(mknod()/remove())
>>> os.mknod(‘test.txt‘)
>>> os.remove(‘test.txt‘)
(4)获取当前路径(getcwd())
>>> os.getcwd()
‘C:\\Python‘
(5)切换目录(chdir())
>>>os.chdir(‘/‘)
(6)列出目录下的所有目录和文件(listdir())
>>> os.listdir(‘.‘)
[‘3.py‘, ‘a.py‘, ‘chromedriver.exe‘, ‘DLLs‘, ‘Doc‘, ‘include‘, ‘Lib‘, ‘libs‘, ‘LICENSE.txt‘, ‘NEWS.txt‘, ‘python.exe‘, ‘pythonw.exe‘, ‘README.txt‘, ‘Scripts‘, ‘tcl‘, ‘test1‘, ‘Tools‘]
(7)文件重命名(rename(old,new)
>>> os.rename(‘test.txt‘,‘a.txt‘)
(8)获取文件/文件夹名
>>> os.path.basename(‘c:\test.txt‘)
‘test.txt‘
(9)获取文件/文件夹路径
>>> os.path.dirname(‘c:\test.txt‘)
‘C:\\‘
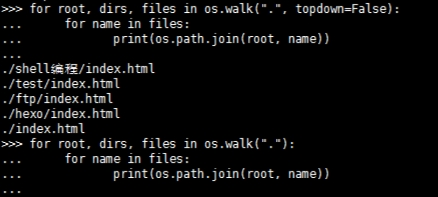
(10)遍历树生成文件名(os.walk(top[,topdown=True[,onerror=None[,followlinks=False]]]))
top-以目录为根的每个目录产生3元组,即(dirpath,dirnames,filenames)。dirpath为目录的路径,为一个字符串。
dirnames列出了目录路径下面所有存在的目录的名称。
filenames列出了目录路径下面所有文件的名称。
topdown-如果可选参数topdown为True或未指定,则从上到下扫描目录。如果topdown设置为False,则会自下而上扫描目录,不懂的话可以看下图的结果就明白了
onerror-这可能会显示错误以继续行走,或者引发异常以中止行走。
followlinks-如果设置为true,则访问符号链接指向的目录。
python中文件操作
相关内容
- python2项目出现的错误(UnicodeDecodeError),python错误,刚启动
- Python3实战Spark大数据分析及调度 (网盘分享),大数据
- 从零起步 系统入门Python爬虫工程师,爬虫工程师,从零
- python成长之路二,成长之路大师二星,python的pri
- python读写本地文件,python文件的读写,当我们需要保存文
- python数据分析之ipython,python与ipython,在用python进行
- Python【每日一问】15,每日五问,问:简述with方法
- Linux 安装Python37,Linux安装Python,1、下载python
- Python_Example_装饰器,Python装饰器,Author: 楚格
- Python数据类型详解——列表,,Python数据类型
评论关闭