RabbitMQ 实现实现基本通信及订单处理,, 一.基本使用 》
RabbitMQ 实现实现基本通信及订单处理,, 一.基本使用 》
一.基本使用 》》》 依据官方文档
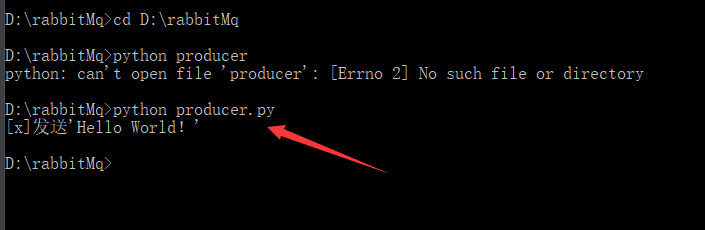
(1)生产端
# python 操作我们rabbitMq 需要的模块 pika# pip install pikaimport pika# 建立和RabbitMQ的链接connection = pika.BlockingConnection(pika.ConnectionParameters(‘localhost‘))# 通过句柄channel = connection.channel()# 声明消息队列channel.queue_declare(queue = ‘hello‘)# body 一个内容体 往队列中进行发消息channel.basic_publish(exchange=‘‘, routing_key=‘hello‘, body=‘Hello World!‘)print("[x]发送‘Hello World!‘")# 关闭connection.close()(2)消费端
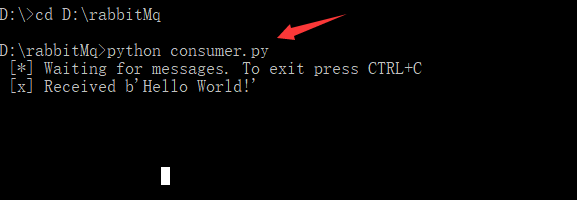
# 取消息import pika# 建立和RabbitMQ的链接connection = pika.BlockingConnection(pika.ConnectionParameters(‘localhost‘))# 通过句柄channel = connection.channel()# 确认我们的queue的是存在的channel.queue_declare(queue=‘hello‘)# 申明回调函数def callback(ch, method, properties, body): print(" [x] Received %r" % body)# 从Q 中取消息channel.basic_consume(queue=‘hello‘, auto_ack=True, on_message_callback=callback)print(‘ [*] Waiting for messages. To exit press CTRL+C‘)channel.start_consuming() # 开始消费(3)执行
窗口一 放信息
窗口二 收消息
RabbitMQ 实现实现基本通信及订单处理
相关内容
- Python爬虫进阶——JsonPath使用案例,,如果一个网站采用
- 001 我和Python的第一次亲密接触,,从IDLE启动Pyt
- Python自学入门基础教程-数据类型,,在程序中,被运算
- 《一头扎进》系列之Python+Selenium框架设计篇6 - 价值好几
- Python自定义包引入【新手必学】,,前言本文的文字及图
- python高级应用程序设计任务,,一、主题式网络爬虫设
- Python高级应用程序设计任务要求,,一、主题式网络爬虫
- Python高级应用程序设计任务,,Python高级应用
- Python爬虫基础——re模块的提取和匹配,,re是Python的
- python3编译安装,, linux下配置安
评论关闭